Android Tutorial-Androidology- Part 1 of 3- Architecture 1 of 3 – Architecture Overview
This Android Tutorial has been taken from Developer.Android
Android Tutorial-Create a New Android Project
After you’ve created an AVD, the next step is to start a new Android project in Eclipse.
- From Eclipse, select File > New > Project.If the ADT Plugin for Eclipse has been successfully installed, the resulting dialog should have a folder labeled “Android” which should contain “Android Project”. (After you create one or more Android projects, an entry for “Android XML File” will also be available.)
Select “Android Project” and click Next.
 3.
3.
Fill in the project details with the following values:
- Project name: HelloAndroid
- Application name: Hello, Android
- Package name: com.example.helloandroid (or your own private namespace)
- Create Activity: HelloAndroid
- Min SDK Version: 2
Click Finish.

- Here is a description of each field:
- Project Name
- This is the Eclipse Project name — the name of the directory that will contain the project files.
- Application Name
- This is the human-readable title for your application — the name that will appear on the Android device.
- Package Name
-
This is the package namespace (following the same rules as for packages in the Java programming language) that you want all your source code to reside under. This also sets the package name under which the stub Activity will be generated.Your package name must be unique across all packages installed on the Android system; for this reason, it’s very important to use a standard domain-style package for your applications. The example above uses the “com.example” namespace, which is a namespace reserved for example documentation — when you develop your own applications, you should use a namespace that’s appropriate to your organization or entity.
- Create Activity
- This is the name for the class stub that will be generated by the plugin. This will be a subclass of Android’s
Activity class. An Activity is simply a class that can run and do work. It can create a UI if it chooses, but it doesn’t need to. As the checkbox suggests, this is optional, but an Activity is almost always used as the basis for an application.
- Min SDK Version
- This value specifies the minimum API Level required by your application. If the API Level entered here matches the API Level provided by one of the available targets, then that Build Target will be automatically selected (in this case, entering “2″ as the API Level will select the Android 1.1 target). With each new version of the Android system image and Android SDK, there have likely been additions or changes made to the APIs. When this occurs, a new API Level is assigned to the system image to regulate which applications are allowed to be run. If an application requires an API Level that is higher than the level supported by the device, then the application will not be installed.
Other fields: The checkbox for “Use default location” allows you to change the location on disk where the project’s files will be generated and stored. “Build Target” is the platform target that your application will be compiled against (this should be selected automatically, based on your Min SDK Version).
Notice that the “Build Target” you’ve selected uses the Android 1.1 platform. This means that your application will be compiled against the Android 1.1 platform library. If you recall, the AVD created above runs on the Android 1.5 platform. These don’t have to match; Android applications are forward-compatible, so an application built against the 1.1 platform library will run normally on the 1.5 platform. The reverse is not true.
Your Android project is now ready. It should be visible in the Package Explorer on the left. Open the HelloAndroid.javafile, located inside HelloAndroid > src > com.example.helloandroid). It should look like this:
package com.example.helloandroid;

import android.app.Activity;
import android.os.Bundle;

public class HelloAndroid extends Activity {
    /** Called when the activity is first created. */
    @Override
    public void onCreate(Bundle savedInstanceState) {
        super.onCreate(savedInstanceState);
        setContentView(R.layout.main);
    }
}
Notice that the class is based on the Activity class. An Activity is a single application entity that is used to perform actions. An application may have many separate activities, but the user interacts with them one at a time. The onCreate()method will be called by the Android system when your Activity starts — it is where you should perform all initialization and UI setup. An activity is not required to have a user interface, but usually will.
Now let’s modify some code!
This Android Tutorial has been taken from Developer.Android and you can click the link to read the complete Android Tutorial
Android Tutorial-Deploy your application on a real device
Turn on “USB Debugging” on your device in the settings. Select in the settings Applications > Development, then enable USB debugging. You also need to install the driver for your mobile phone. For details please see Developing on a Device . Please note that the Android version you are developing for must be the installed version on your phone.
To select your phone, select the “Run Configurations”, select “Manual” selection and select your device.


This Android Tutorial is taken from Vogella
Android Development Tutorial-Android Apps can easily embed the web

This ANDROID TUTORIAL is taken from Android Developers
Portions of this page are reproduced from work created and shared by the Android Open Source Project and used according to terms described in the Creative Commons 2.5 Attribution License.
Android Tutorial -Application architecture
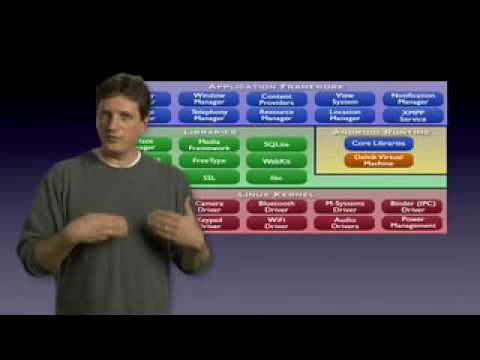
As mentioned, Android runs atop a Linux kernel. Android applications are written in the Java programming language, and they run within a virtual machine (VM). It’s important to note that the VM is not a JVM as you might expect, but is the Dalvik Virtual Machine, an open source technology. Each Android application runs within an instance of the Dalvik VM, which in turn resides within a Linux-kernel managed process, as shown below.

An Android application consists of one or more of the following classifications:
- Activities
- An application that has a visible UI is implemented with an activity. When a user selects an application from the home screen or application launcher, an activity is started.
- Services
- A service should be used for any application that needs to persist for a long time, such as a network monitor or update-checking application.
- Content providers
- You can think of content providers as a database server. A content provider’s job is to manage access to persisted data, such as a SQLite database. If your application is very simple, you might not necessarily create a content provider. If you’re building a larger application, or one that makes data available to multiple activities or applications, a content provider is the means of accessing your data.
- Broadcast receivers
- An Android application may be launched to process a element of data or respond to an event, such as the receipt of a text message.
An Android application, along with a file called AndroidManifest.xml, is deployed to a device. AndroidManifest.xml contains the necessary configuration information to properly install it to the device. It includes the required class names and types of events the application is able to process, and the required permissions the application needs to run. For example, if an application requires access to the network — to download a file, for example — this permission must be explicitly stated in the manifest file. Many applications may have this specific permission enabled. Such declarative security helps reduce the likelihood that a rogue application can cause damage on your device.
The next section discusses the development environment required to build an
Android application.
This Android Tutorial has been taken from IBM Android Tutorial
Android Development Tutorial -Tipster: Introduction
A tip calculator is quite a simple application. When you go with friends to a restaurant and wish to divide the check and tip, you simply add the tip percentage to the total and divide by the number of diners. I have seen this application on my simple cell phone too. So I thought of implementing it in Android as a means to learn how it all works.
When I looked at the various tutorials, each one demonstrated a specific set of features. I tried different tutorials and then set about to write an application which would be as close to a real world application. Obviously this meant using different features of the API. The end result was a good enough application which used lots of features all in one application.
I know that many developers want a short tutorial with just the code pieces and brief explanations. Somehow, I cannot just post code and few comments. I always end up writing such tutorials as if I am speaking out to a live person.
So here it is, whatever I learnt and applied, for your perusal.
Building Blocks
I am assuming that you have read the Google Android website and know a bit about Android applications. At least enough to know how to build and run the Hello World example. It would be best if you read through this set of API examples.
So, lets proceed.
Android uses XML files for the Layout of widgets. In our example project, the Android plugin for Eclipse generates a main.xml file for the layout. This file has the XML based definitions of the different widgets and their containers.
There is a strings.xml file which has all the string resources used in the application. A default icon.png file is provided for the application icon.
Then there is the R.java file which is automatically generated (and updated when any changes are made to main.xml). This file has the constants defined for each of the layout and widget. Do not edit this file manually. The plugin is does it for you when you do a clean build.
In our example we have Tipster.java as the main Java file or the Activity.
Creating the project using the Android Eclipse Plugin
Google tutorials highlight how to use the plugin. Using the Eclipse plugin, create an Android project named Tipster. The end result will be a project layout like the following screen shot.
 Fig. 1 – Project layout for Tipster in Eclipse
This Android Tutorial is taken from whyandroid click the link to read the full article.
Android Tutorial-Android Apps without borders

This Android Tutorial is taken from developer.android
Portions of this page are reproduced from work created and shared by the Android Open Source Project and used according to terms described in the Creative Commons 2.5 Attribution License.
Android Tutorial-The Android platform
The Android platform With Android’s breadth of capabilities, it would be easy to confuse it with a desktop operating system. Android is a layered environment built upon a foundation of the Linux kernel, and it includes rich functions. The UI subsystem includes: * Windows * Views * Widgets for displaying common elements such as edit boxes, lists, and drop-down lists Android includes an embeddable browser built upon WebKit, the same open source browser engine powering the iPhone’s Mobile Safari browser. Android boasts a healthy array of connectivity options, including WiFi, Bluetooth, and wireless data over a cellular connection (for example, GPRS, EDGE, and 3G). A popular technique in Android applications is to link to Google Maps to display an address directly within an application. Support for location-based services (such as GPS) and accelerometers is also available in the Android software stack, though not all Android devices are equipped with the required hardware. There is also camera support. Historically, two areas where mobile applications have struggled to keep pace with their desktop counterparts are graphics/media, and data storage methods. Android addresses the graphics challenge with built-in support for 2-D and 3-D graphics, including the OpenGL library. The data-storage burden is eased because the Android platform includes the popular open source SQLite database.
Figure 1 shows a simplified view of the Android software layers.
Figure 1. Android software layers
 This Android Tutorial is taken from IBM
Android Tutorial-Google I/O 2009 – …Make your Android UI Fast and Efficient
This Android Tutorial has been taken from developer.android
Android Development Tutorial- Developing In Eclipse, with ADT
The Android Development Tools (ADT) plugin for Eclipse adds powerful extensions to the Eclipse integrated development environment. It allows you to create and debug Android applications easier and faster. If you use Eclipse, the ADT plugin gives you an incredible boost in developing Android applications:
- It gives you access to other Android development tools from inside the Eclipse IDE. For example, ADT lets you access the many capabilities of the DDMS tool: take screenshots, manage port-forwarding, set breakpoints, and view thread and process information directly from Eclipse.
- It provides a New Project Wizard, which helps you quickly create and set up all of the basic files you’ll need for a new Android application.
- It automates and simplifies the process of building your Android application.
- It provides an Android code editor that helps you write valid XML for your Android manifest and resource files.
- It will even export your project into a signed APK, which can be distributed to users.
To begin developing Android applications in the Eclipse IDE with ADT, you first need to download the Eclipse IDE and then download and install the ADT plugin. To do so, follow the steps given in Installing the ADT Plugin.
If you are already developing applications using a version of ADT earlier than 0.9, make sure to upgrade to the latest version before continuing. See the guide to Updating Your ADT Plugin.
Note: This guide assumes you are using the latest version of the ADT plugin. While most of the information covered also applies to previous versions, if you are using an older version, you may want to consult this document from the set of documentation included in your SDK package (instead of the online version).
Creating an Android Project
The ADT plugin provides a New Project Wizard that you can use to quickly create a new Android project (or a project from existing code). To create a new project:
- Select File > New > Project.
- Select Android > Android Project, and click Next.
- Select the contents for the project:
- Enter a Project Name. This will be the name of the folder where your project is created.
- Under Contents, select Create new project in workspace. Select your project workspace location.
- Under Target, select an Android target to be used as the project’s Build Target. The Build Target specifies which Android platform you’d like your application built against.Unless you know that you’ll be using new APIs introduced in the latest SDK, you should select a target with the lowest platform version possible.Note: You can change your the Build Target for your project at any time: Right-click the project in the Package Explorer, select Properties, select Android and then check the desired Project Target.
- Under Properties, fill in all necessary fields.
- Enter an Application name. This is the human-readable title for your application — the name that will appear on the Android device.
- Enter a Package name. This is the package namespace (following the same rules as for packages in the Java programming language) where all your source code will reside.
- Select Create Activity (optional, of course, but common) and enter a name for your main Activity class.
- Enter a Min SDK Version. This is an integer that indicates the minimum API Level required to properly run your application. Entering this here automatically sets the
minSdkVersion attribute in the <uses-sdk> of your Android Manifest file. If you’re unsure of the appropriate API Level to use, copy the API Level listed for the Build Target you selected in the Target tab.
- Click Finish.
Tip: You can also start the New Project Wizard from the New icon in the toolbar.
Once you complete the New Project Wizard, ADT creates the following folders and files in your new project:
src/- Includes your stub Activity Java file. All other Java files for your application go here.
<Android Version>/ (e.g., Android 1.1/)- Includes the
android.jar file that your application will build against. This is determined by the build target that you have chosen in the New Project Wizard.
gen/- This contains the Java files generated by ADT, such as your
R.java file and interfaces created from AIDL files.
assets/- This is empty. You can use it to store raw asset files.
res/- A folder for your application resources, such as drawable files, layout files, string values, etc. See Application Resources.
AndroidManifest.xml- The Android Manifest for your project. See The AndroidManifest.xml File.
default.properties- This file contains project settings, such as the build target. This files is integral to the project, as such, it should be maintained in a Source Revision Control system. It should never be edited manually — to edit project properties, right-click the project folder and select “Properties”.
- Android development Tutorial has been taken from developer.android click the link to read the rest of the Android Tutorial


